 how-to
How to Fix a Jammed Magazine Speedloader
Table of Contents
- Why Your Magazine Speedloader Gets Jammed
- Safety Precautions Before You Start
- Identifying the Source of the Obstruction
- Magazine Speed Loader Maintenance Best Practices
- Step-by-Step Disassembly and Clearing Process
- How to Clean a Pistol Speed Loader
- Magazine Speed Loader Maintenance and Spring Replacement
- When to Contact Manufacturer Support
- Frequently Asked Questions
Last Updated: September 27, 2026
Why Your Magazine Speedloader Gets Jammed
A jammed magazine speedloader happens when rounds, debris, or mechanical friction prevent smooth loading. The problem usually stems from one of three sources: worn internal components, improper magazine fit, or accumulated dirt and polymer shavings inside the loader.
Speedloaders wear down over time as the follower, feed lips, and internal housing experience friction with every use.
Magazine compatibility matters significantly. A speedloader designed for 9mm Glock magazines won't compress springs properly on a .45 ACP high-capacity mag, and forcing an incompatible magazine creates excessive pressure that jams the mechanism and can strip feed lips or damage the base plate.
The Bulletproof EZ-MAG Pistol Speed Loader fits magazines of most major brands, but even universal loaders have limits. Knowing your magazine's specifications prevents most jam problems before they start.

Safety Precautions Before You Start
Always unload your firearm completely and remove all ammunition from the room before working with magazines or speedloaders to eliminate any chance of accidental discharge.
Wear eye protection when disassembling components, as small springs can release suddenly and polymer shavings can scatter during cleaning.
Work on a clean, well-lit surface with a towel underneath and use a parts tray to organize components as you disassemble, preventing lost parts that would require manufacturer replacement.
Keep your speedloader away from children and untrained individuals while it's disassembled. Store all components in a secure location until reassembly is complete.
Identifying the Source of the Obstruction
Insert an empty magazine into the jammed speedloader without pressure and feel for resistance. Load a single round using normal pressure and watch where it stops. Test with a different magazine of the same caliber, if the speedloader works fine with another magazine but jams with the first, the problem is magazine-specific (worn feed lips or bent base plate), not the loader.
Inspect the speedloader's internal housing for visible cracks or warping, as polymer loaders can develop stress fractures after drops or impacts that create friction points catching rounds mid-load.
Check the magazine follower for damage, a cracked or bent follower prevents proper round stacking and causes binding when the speedloader compresses the spring, requiring magazine replacement.
Look inside the speedloader's chamber for debris using a flashlight. Dirt, lint, and polymer shavings accumulate over time and create drag that slows round feeding and causes jams.
Magazine Speed Loader Maintenance Best Practices
Clean your speedloader every 500-1,000 rounds using a soft brush or compressed air to remove particles from the internal housing and prevent debris buildup.
Apply a thin coat of silicone-based lubricant to the lever and catch mechanism monthly to reduce friction, avoiding heavy oils that attract dust and create sticky buildup. Wipe away excess with a clean cloth.
Store your speedloader in a cool, dry location, as moisture causes polymer swelling and extreme heat warps materials. A climate-controlled storage box protects your loader from environmental damage.
Inspect spring tension regularly, if your speedloader requires noticeably more force to load than it did months ago, the spring is weakening.
Test your speedloader monthly with different magazine types to catch compatibility issues early, as loaders may struggle with certain brands due to dimensional differences in feed lips and base plates.
Rotate between multiple speedloaders if you shoot frequently to extend each loader's lifespan by distributing wear.
Step-by-Step Disassembly and Clearing Process
Check the manufacturer's documentation for your specific model to identify how it comes apart.
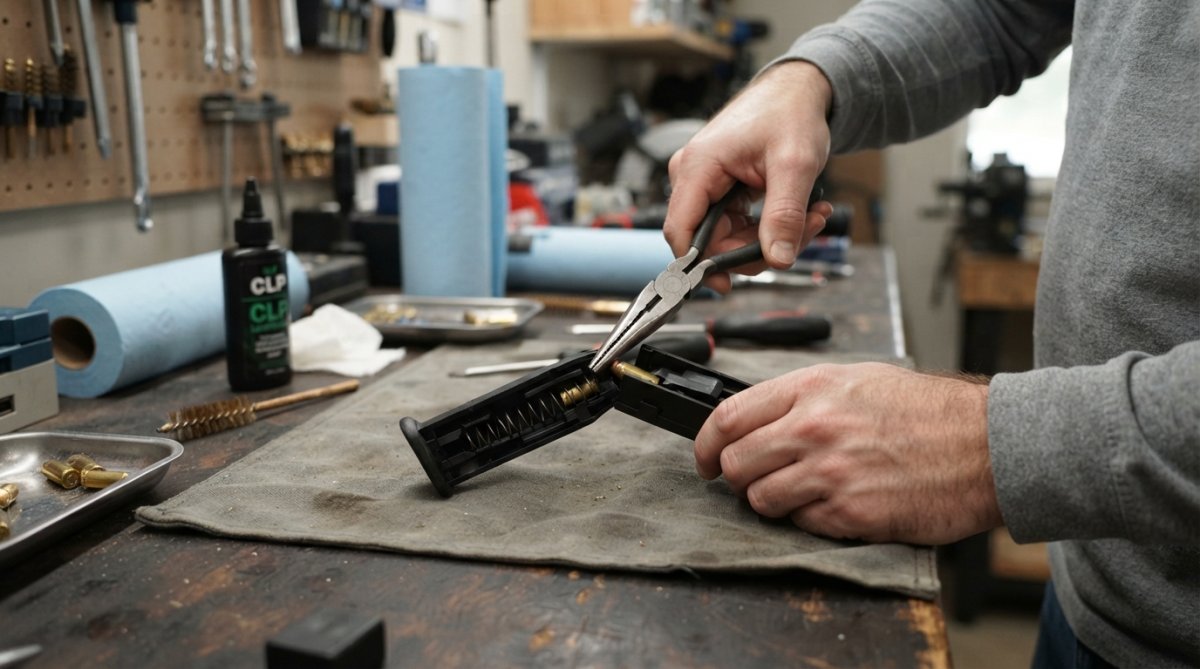
For the Bulletproof EZ-MAG, the base plate typically slides off or unscrews. Remove it slowly and support the internal spring and follower, which are under tension, so they don't fly across the room.
Gently remove the follower and spring and inspect both for damage, a bent follower or broken spring explains most jam problems.
Use needle-nose pliers to extract stuck rounds by gripping the base firmly and pulling straight out with steady pressure, avoiding twisting that can damage the round or loader's internal walls.
Examine the internal chamber with a flashlight and remove debris with a soft brush or compressed air. For stubborn shavings, use a cotton swab slightly dampened with isopropyl alcohol, then dry completely before reassembly.
Check the loader's internal walls for cracks or rough spots by running your finger along inside surfaces. Sharp edges indicate damage; rough spots can be gently smoothed with fine sandpaper, but deep cracks require replacement.
Bulletproof EZ-MAG Pistol Speed Loader →
Reassemble in reverse order: slide the spring into place, position the follower on top, and install the base plate ensuring it seats fully. The loader should feel balanced and operate smoothly.
How to Clean a Pistol Speed Loader
Start with compressed air, using short bursts to blow debris from external surfaces and around the lever while holding the loader upside down so particles fall away from the mechanism.
Use a soft-bristled brush to remove stubborn particles. Avoid brass brushes inside the loader as they're too abrasive for polymer; use a nylon brush or old toothbrush for internal cleaning instead.
For heavy buildup, disassemble the loader and soak the polymer body in warm water with dish soap for 10-15 minutes to loosen dried lubricant and debris, then scrub and rinse thoroughly. For metal-bodied loaders, wipe internal surfaces with a cloth dampened in isopropyl alcohol and dry immediately to prevent corrosion.
Dry all components completely with a clean cloth. Let them air dry for 30 minutes to ensure no moisture remains. Moisture trapped inside the loader promotes corrosion on metal parts and can cause polymer swelling.
Lubrication Best Practices by Material Type
For polymer-bodied loaders: Apply only silicone-based lubricants or dry PTFE sprays. These products don't attract dust and won't degrade polymer over time. Avoid mineral oils, gun oils, and heavy greases, they soften polymer and create sticky buildup that worsens jamming. A single light coat on the lever, catch mechanism, and spring is sufficient. Wipe away all excess with a clean cloth; any visible residue indicates over-lubrication.
For metal-bodied loaders: Light machine oil, gun oil, or silicone spray all work safely. Metal components resist most lubricants, but avoid thick greases that accumulate in tight tolerances and slow the loading action. Apply lubricant sparingly to the lever pivot point, the catch mechanism, and the spring contact points. Metal loaders tolerate slightly more lubricant than polymer versions because metal doesn't swell, but excess still attracts grit and creates drag.
For mixed-material loaders (aluminum body with polymer components): Treat the polymer surfaces with silicone spray only. For metal surfaces, use gun oil or light machine oil. Never apply the same lubricant to both, silicone spray can leave residue on metal that attracts dust, and gun oil can degrade polymer seals over time.
Why Lubrication Matters for Jam Prevention
Under-lubricated loaders develop friction that causes jams, especially in cold weather. Over-lubricated loaders attract lint, dust, and powder residue that accumulate and cause binding. The goal is a thin, dry-feeling coating that reduces friction without trapping particles.
After cleaning, always reapply lubricant and test with an empty magazine, the loading action should feel smooth and require consistent pressure throughout the stroke.
Magazine Speed Loader Maintenance and Spring Replacement
Springs weaken gradually with use. Recognizing the signs of spring fatigue before complete failure prevents jams and frustration at the range.
Diagnosing Spring Fatigue
Spring degradation follows a predictable pattern. In the first stage, you'll notice the loader requires slightly more force to compress the magazine fully. This is the earliest warning sign. At this point, the spring still functions but has begun losing elasticity.
In the second stage, the loading action becomes inconsistent. Some rounds load smoothly while others jam halfway through, especially when the magazine is more than half full. This happens because the weakening spring can't maintain consistent pressure throughout the full compression stroke. The spring compresses easily at first but can't hold the magazine down as you load deeper rounds.
In the third stage, the loader fails to compress the magazine fully, leaving the final 1-3 rounds unloaded. The spring simply lacks the strength to push back against the magazine's resistance. At this point, replacement is mandatory.
To test spring condition, load an empty magazine using normal pressure.
Replacement Spring Selection and Installation
Replacement springs are available from some manufacturers. Before ordering, identify your loader's exact model and note the spring's specifications: length, diameter, and wire gauge.
Inspecting Related Components During Spring Replacement
While disassembled, inspect the catch mechanism and lever for wear. If the catch is cracked, the lever is bent, or the pivot point is loose, contact the manufacturer.
Preventative Spring Maintenance
Keep a maintenance log recording the date and round count when you clean or service your speedloader.
When to Contact Manufacturer Support
If your speedloader has cracks in the polymer housing, replacement is the safest option, as cracks create sharp edges that can damage magazines and fingers, and repairs are temporary.
Frequently Asked Questions
Why is my magazine speed loader getting stuck?
Jammed magazine speedloaders typically result from debris accumulation, misaligned feed lips, worn springs, or cartridges wedged at an angle. Polymer-based loaders can develop friction points where the follower or spring pressure causes rounds to bind. Check for dirt, shaving from polymer wear, or a bent base plate. High-capacity magazines sometimes require greater spring tension than your loader provides, causing pressure-related jams. Regular cleaning prevents most obstruction issues.
Can a dirty speed loader cause loading issues?
Yes. Debris, powder residue, and polymer shavings accumulate inside the loader's internal housing, increasing friction between the cartridge and the loading mechanism. This buildup restricts the round's movement and prevents proper cycling. Cleaning your speed loader monthly removes these particles and restores smooth operation. Use a dry brush or compressed air to clear internal components, then wipe exterior surfaces with a lint-free cloth.
How do I safely clear a jammed round in a speed loader?
First, ensure the loader is empty and pointed in a safe direction. Remove the magazine if attached. Gently wiggle the stuck cartridge side-to-side using needle-nose pliers, avoid forcing it, as this can damage the feed lips or round. If resistance persists, disassemble the loader by removing the base plate or follower (depending on design). Once disassembled, you can access the obstruction directly and remove it without mechanical pressure. Reassemble and test with an unloaded magazine.
What's the difference between the Bulletproof EZ-MAG and other pistol speed loaders?
The Bulletproof EZ-MAG Pistol Speed Loader uses a two-step design that reduces hand fatigue and loads flawlessly with minimal effort. Made from superior polymer materials, it resists heat and scratches while maintaining precision tolerances. It fits Glock 17-47, Sig P229, P320, P365, Springfield XD, Ruger SR9, CZ P10, Beretta 92, and many single-stack magazines. At $34.95, it delivers combat-ready performance with Bulletproof's lifetime RRR warranty, ensuring you can reload confidently at the range or in the field.